CLICK HERE FOR FREE BLOGGER TEMPLATES, LINK BUTTONS AND MORE! »

ATuttleTime's Fabulous and Amazing Followers!

Wednesday, January 26, 2011

FINALLY....THE WINNERS OF VALENTINE'S DAY BLOG HOP BLOG CANDY!

I am so sorry I am a few days behind on posting the winner of this past weekend's fabulous Valentine's Day Card Blog hop...One of the primary reasons for my delay is pictured here:

My sweet 2yr old is adorable and always loves to be right dead center of whatever I am doing....making messes, lots of noise, and demands! Kids! LOL...anyway...

The Valentine's Day card blog hop was so much fun to hop through and participate in...I was blown away by all the sweet comments, encouragement, and confidence- boosters!  Until recently, my cards looked like they were made by elementary school students! :)  With help of my Cricut, Stickles, cool stamps, and paper, I have graduated to high school...LOL! 
Anyway, on to the excitement...the winners of my blog candy! 
Happy Kick Feet Pictures, Images and Photos


Originally, I posted one blog candy prize, but I had forgotten that I had purchased another small prize for a second lucky winner! 


FIRST PRIZE.... STAMPIN UP CIRCLE TREAT CUPS AND TURQUOISE CARDS...


SECOND PRIZE....TWO CUTE CLEAR STAMPS AND GLITTER GLUE.


If you are one of the lucky Random.org selected winners...Please leave a comment with the best way to contact you to get your mailing address!

Monday, January 24, 2011

Yay for the Steelers

The Steelers are going to the Superbowl!  I have cheered on the Steelers since I was a teen, so when they made it through the playoffs and on to the Super Bowl, I was so happy!  As I stared at the logo, I thought...Hmmm, I think I could make that with the Cricut.  I made it using George Basic Shapes and just wrote in the name.  It was rather complicated to make though, so this will be IT for me! :)  It will probably go in our scrapbook with pics from the Superbowl party we may have or go to.  No plans yet, but there will be good times with friends!  I hope you have a great week!  Laterz... Angie

Saturday, January 22, 2011

Valentine's Day Blog Hop.... Stop #4

HELLO AND WELCOME to your 4th stop on the Valentine's Day Cards Blog Hop...  If you just arrived here from: Elaine, you are hopping along the right trail!  If for some reason, you stopped here first…just click on Cupid (below) for a list of all blogs...Please start with Ellen, our Hostess with the Mostest (#1 CardMonkey):

Ok, now to the reason you stopped by...CARDS!  I had so much fun making my family their Valentine's Day cards.  All animals were cut using the Create a Critter Cricut Cartridge. The letters were cut using the Alphalicious cartridge.  These my two favorite cartridges so far...

Card #1 is for my hubby...."Whale You Just Kiss Me!...I wuv you!"  We love to make big pucker lips....
I cut the whale at 4inches using black (shadow), baby blue glitter (layer 1), and silver grey (layer 2).  Card is baby blue glitter cardstock. I  just love how the puckered glitter red lips turned out...so I made two whales!


Card#2 For my 2yr old daughter...
I made a cute Hawaiian bear card, that says, "I LAVA YOU!"  I say this to her all the time, so I was so excited that the Create a Critter cart had the volcano.  I turned the little dress into a flowery mumu and added stickles for BLING.

Card# 3 is for my 12yr old son...When he was a baby, I used to sing to him, "You are my sunshine..my only sunshine.."  When I found some cheerful ribbon with this sentiment, I had to incorporate that into his Valentine's day card.
This is card features one of my favorite things, Treat Cups from Stampin-UP!.  My friend, Crystal at Rustic Daisy is a fabulous artist and my Stampin Up contact...If interested, she can hook you up...or stay tuned for info on how you can win some BLOG CANDY!!!
The sun and butterfly are Create a Critter, too.  I added glitter glue to add some spark and dimension to compliment the glittery blue paper.  For step by step photo instructions, check out this slide show or leave a comment with your email (and I'll email you my photo instructions).


Card#4  A SWEET Valentine
...Stampin-Up! also has a stamp set to go with the treat cup.  For this Valentine's Day card, I used the "I love you" stamps, but it comes with a Halloween, Flower petal, and Hot Air Balloon stamps.  Can't wait to try those out.

Card # 5 ~~  "Bananas Over You"
In honor of our Blog Hop Host, Card Monkey, I created this girly monkey card using my favorite Critter cartridge....Isn't she cute, complete with pink coat and shiny red lips?!  My mama always said to be sure to apply lipstick!
The treat cup is filled with banana candies (Runts)...this was to tie with the sentiment inside "Bananas over You"...cut with Alphalicious.

Now the moment you've been waiting for...BLOG CANDY!

One lucky person has a chance to win:  a box of Stampin-Up! Treat Cups and a set of cards already equipped with the perfect size hole for the cups!
To win:  Please leave a comment that includes how you would use the treat cups and then hit the "FOLLOW" button to the right...so you can check back from time to time!

Grab a cup of coffee and a danish...Sit back and enjoy the rest of the HOP! 
 I hope you get wonderful ideas and learn some new techniques...You will also have opportunities to scoop up some “delicious” blog candy.   Your next stop is:   Darlene

Have a great weekend!!!

Thursday, January 20, 2011

VALENTINE'S DAY BLOG HOP

Sorry I haven't been posting much lately, but I am just starting back in the office with my job (after snow and holidays).  I am also preparing for a fun and fabulous Valentine's Day Blog Hop for this weekend.  It'll be my first.  I will probably go overboard with projects and blog candy...but, hey, that's me!  I hope you check back on Saturday and Sunday.  I plan to post project on BOTH days and will be offering a few goodies, too.  The blog hop starts here:  http://cardmonkey-business.blogspot.com/.

Happy Crafting!!  <3 Angie

Saturday, January 15, 2011

Hoppin' and Sippin'

I had a few minutes...ok, more like an hour...to sit and sip on my homemade Dunkin Donut coffee (thanks to Hubby!).  I am hopping through an awesome Blog Hop, "It's My Party."  There are awesome ideas...prizes.  Celebrating birthdays is my favorite, so I am excited to hop along this today! 

Thursday, January 13, 2011

Beading....

Another craft I have really enjoyed is beading...I am still in the process of honing my skills and improving my techniques, always in learning mode.  For gifts, I try to make the ladies in my family something.  This year, I asked my sisters what they wanted for Christmas.  My sis, Lynn, was very specific...which I love (since she is a diva and only loves the best! LOL!).  She sent me a link to this necklace...
This is a designer piece and other pieces like it list at over $100 or so.  Overstock.com listed it at just around $50.  When I saw it, I thought, "I can make that for less than that!"  Well, I scoured bead stores around town to find the beads in this necklace...Much to my dismay, I could not find the pendant anywhere...so it must be a unique piece.  Did that stop me?  No.  I found some beads that were similar...and this is what I came up with....

 I wish I would have been able to get a better photo of the necklace to show the details of the beads.  This is not a shirt my sister would normally wear with this, either.  Oh well...I was very pleased with the beads I found...However, I was not happy with the first pendant I chose.  Despite what many had said, I just didn't think it was perfect.  When I gave it to my sister, I asked for her to be honest with me...She and I agreed.  It had to go.  As a result, I found this blue rose at Michael's.  It tied the pearl and the turquoise/silver beads perfectly together.  I am so happy with how the necklace turned out.  It's by far the nicest piece I've made.  I even think I pleased Mrs. Diva, too. :)) (love you Lynn!)
 

Wednesday, January 12, 2011

Cricut Cardz Challenge #57

I had some free time today...being stuck in the house with all the icy roads and snow...no school and office closed...so I decided to lasso my 12yr old son, Caleb, into helping me with Cricut Cardz Challenge # 57.  At first, he was whining like my 2yr old and didn't want to.  However, once we started cutting this cute bug out....his whines turned to, "Ooo...she's so cute!" I have to agree...very happy with her.  I'm not sure I complied with the rules of the challenge, though...I just read that I was to use red, white, and black ONLY!...I added pink for the face and the black and white patterned paper have silver glitter specks.  Oh well!  I'll read better next time.
 We used my favorite Cricut cartridge...Create a Critter...You can't tell, but the red paper is glittery (because I love bling!).  Caleb wanted the little bug to have bows and dress (Wait, til I tell his friends about this...hee hee!).  Anyway, we did and I just love the result.  The dress is from the Teddy Bear character and the bows are from the Lamb on the same Critter cart.  I added a wavy lines (cut with the wavy Creative Memories cutter)...cut in the same sparkly red and black white papers. We were both inspired by our little Miss Ladybug, my daughter Michelle (2yr) who wore the costume for Halloween:

Glad he was able to spend time away from the video games!

Gingerbread House Scrap

While going through my scrapbook pages, I came across this cute 2-page spread...Gingerbread House.
 I made the Gingerbread "Dude," Gingy, and his House from the Stretch-Your-Imagination and the letters are from Alphalicious Cricut carts.
 Isn't it cute? :)
 I love these photos, too....so the cute embellishments just add to what I love about the pages.  The pages were more of a success than Gingy's House, which did not make code....! 
Oh well...it was fun, while it lasted.  I hope we have better luck this year!

February Card Exchange

I am so excited to be involved with a Cricut Monthly Card exchange that I found on Facebook.  I was so psyched that I also decided to begin another card exchange.  I am going to start thinking of my designs for February....Hearts, glitter, sweets!  Ooo, this Valentine's is going to be fun, but I'd better get started soon!  I have to get my cards in the mail before February 1st!!  

Monday, January 10, 2011

Pink Carnation

My sister, who I hope is not following this blog yet, introduced me a wonderful series of books.  I don't have the time or patience to sit and read a long book, so my sister found this book on audio CD from the library.  If you enjoy a nice romance mystery that light hearted and fun.  These books are great...The first of the Series is, The Pink Carnation:
This book is set in France...so when creating my sister's Christmas Thank-You card...I had to incorporate "Merci" and a simple pink carnation into her card.  I scoured the web to find instructions on how to create a paper carnation.  Most of them were made using tissue paper.  I wanted one made of paper...scrapbooking paper.  Boy, was I in luck when I hopped over to My Basket of Scraps!  Many many thanks to Jackie for her very simple and easy to follow Carnation paper flower tutorial.  I love that she photographed each step...This made creation of my carnation a breeze.  For my card, I didn't use quite as many circles, because I want mine to be able to fold flat (semi-flat) for mailing.  Isn't it cute?

The card is a dark burgundy color with a colorful flower ribbon to line the bottom.  Because no card is complete without bling, I had to dot the centers of the flowers with pink Stickles.  Now that I am finished with the Pink Carnation...It's on to the next book in the series, The Masque of the Black Tulip.  Now, that's a flower I will be playing with in a few months...for Spring! 

Saturday, January 8, 2011

Holy Cricut Challenge #3

 I found this challenge on FB (Holy Cricut Challenge#3)...I am always up for a challenge...especially if it's fun and sparkly!

The challenge is to create anything, using the following 4 items.

Snowman
Ribbon
Patterned paper
Stickles
In case you don't know what Stickles are....I've posted a photo of the bottle.  I only recently discovered them and am completely hooked.  It's the BEST glitter glue I've ever used.  I would buy a bottle of each color...except I promised myself I wouldn't do that until I use up the "blah" blands of glitter glue I already have. 

With the way I've been crafting cards, that may not take too long! :)  Anyway, to the challenge...
I wanted to make my family Christmas THANK-YOU cards...so my challenge result is this cute, sparkly card.  The card is made of baby blue glitter stiff cardstock.  I then put snowflake patterned paper on it.  I used the decorative corner rounder to give Mr. Snowman a nice place to stand.  I put clear, white Stickles into the snowflakes of the patterned paper.  This makes them pop.  Mr. Snowman and large snowflake was made with the Cricut, Stretch Your Imagination cartridge.  I added dimension by using foam squares under the snowman and snowflake.   There is a little basic white ribbon at the bottom that I dotted with turquoise blue Stickles.  The sentiment, "Thanks Snow Much!," was stamped using the Skipping Stone Design stamp (Snowman collection).  I hope Mr. Snowman warms your heart!  Happy New Year!!

Wild about Wild Card

I purchased this cartridge about 8months ago....
I recently discovered it in our laundry room.  Don't ask me how it flew in there, but I have a feeling the Owl been galavanting around the house with my 2yr old...  Who knows??!  Anyway, I am so glad I found it.  I am absolutely WILD about this cartridge.  Inspired by my Cricut-loving Facebook friends, I decided to make all my Christmas thank-you cards.  See below for my earlier set of cards.  I hope to make many more cards using the Wild Card cartridge.  This Owl Card is by far my favorite one.  It's probably the coolest card I've ever made...
The owl opens up and is the card.  The tree scenery is the envelope.  When you close up the envelope, it reveals the shape of a tree...There is also another tree that can be made and added to the front of the envelope!  I used light blue glitter cardstock for the sky.  Assembling this card was like putting together a puzzle.  I also cut a little tree to embellish the front of the Envelope.
Next is a card with a botanical garden-feel to it.  I used a grey as soothing background to the tree branch.  It was fun to hit a button and minutes later see this all come out...
I used a burgundy pink for the envelope, which has a sweet little cut of the branch on it's back flap.  I put an ornate frame (also part of the cartridge) on the address side of the envelope.
This house one was another fun one to put together.  I matched the house colors of this house with the colors from the card recipient's house...

I love the little door flap.  My plan is to type out and print from the computer, "Thanks for Opening your home."  Inside the house is space for me to write out my thank you note.  I am looking forward to mailing these out and hope the recipients of these cards will be pleased to get them, too....

Wednesday, January 5, 2011

I Wanna Thank You...

This year, inspired by a New Year's Thank-You Blog Hop I found on FB, I decided to make all of my Christmas thank-you cards.  I had some rare free time yesterday, so I made a few of the cards.  This fish is probably my favorite one so far...It's not really a Thank-You card, but it's for someone we visited with during the holidays! 
Card is made of turquoise cardstock cut in a long rectangle, scored, and folded in half.  Inside was cut using the "Alphalicious" Cricut cartridge and says...
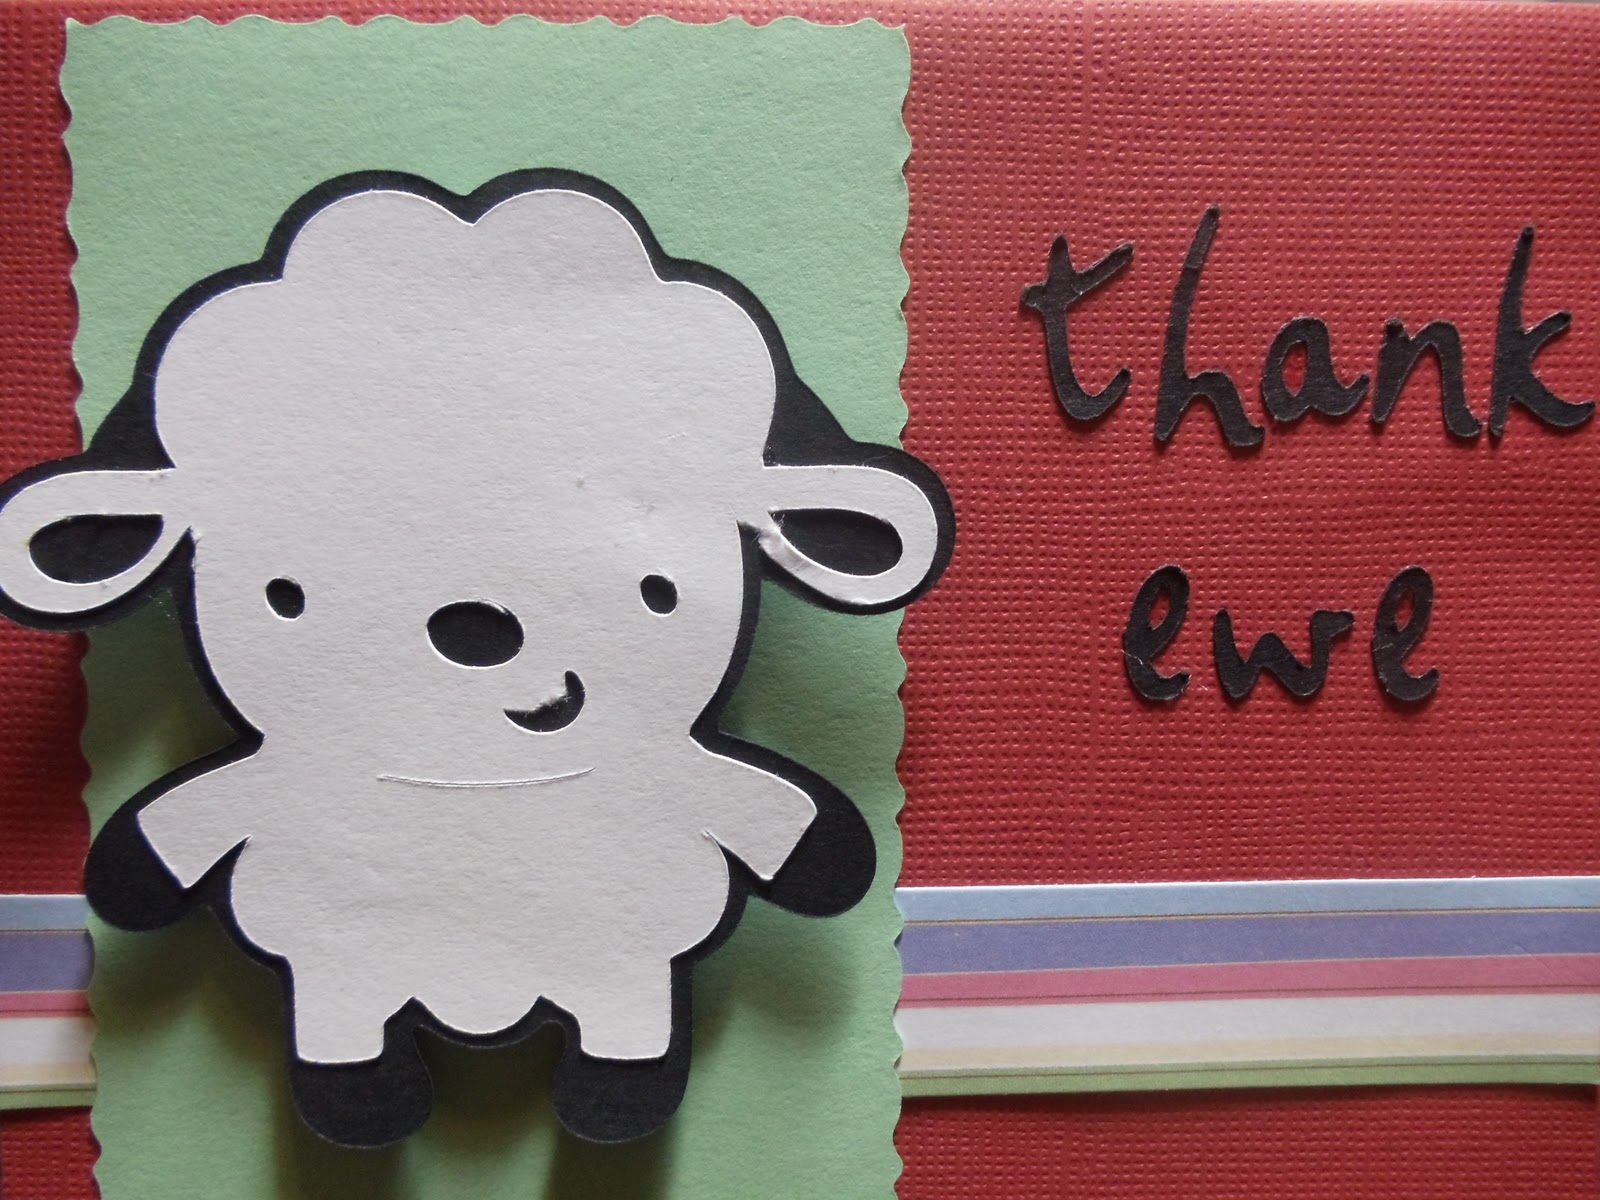
My favorite Cricut cartridge by far is the "Create-A-Critter."  It makes a huge assortment of cutesy animals with accessories, backgrounds, and phrases.  Each one has turned out so cute, that I can't wait to find a use for all of them.
How do you like this cute little "ewe," which I recently discovered means female sheep.  Guess I'm going to need to add a bow to it...
I loved the colors on this Elephant card so much that I made two of them...It's hard to see, but the black paper has silver  circles that glitter in light.  I LOVE anything that glitters and sparkles, so I had fun with this one.  The elephant was pretty fun to cut out, too.  The pink just adds the right touch!  The card is folded like a matchbook, so the card can stand up....the outside says, "We had tons..." (I cut the letters using the Alphabet from the Cricut "Wild Card" cartridge)
When you open the first flap, it continues, "...of fun!"  Then the bottom flap, which would be the bottom of the inside of the card (matchbook), says, "Thanks!"
For Christmas, I bought an adorable set of snowmen clear stamps from Skipping Stones Design.   I made my coworkers some "Snowman Poo" cards with them.  This was my first time using clear stamps, and now I am completely hooked!  How cool is it to be able to see where you are stamping?!   The stamp designs peel off a plastic sheet and then you stick it to a clear acrylic block (mine has lines on it).  Anyway, I now love stamping and plan to add to may clear stamp collection...but I digress...Just because Christmas has gone, I had to find one last use for my snowman...and here it is. 

 The collection came with a cute anecdote, "Thanks SNOW much!..." The stylish scarf has polka dots, so I colored the scarf the same colors as in the patterned paper that I used.  Then, to add an extra touch, I made snow out of dots of glitter glue.  The picture does not reflect the sweet glittery snow flakes...but trust me, it's cute!
The snowman cards are the easiest one of this group, and I love working with the clear stamps...I will make several more of those to give away to family.  After making some gift cards and these thank-you cards, I am psyched to make some birthday cards...I also signed up for a Cricut Card and a Spring/Easter Critter exchange through FB.  I am also starting an card exchange through friends on FB, too.  The Cricut, Stamps, and card-making has really opened the door to a fun new world for me....COME JOIN ME! :)